Dream house, dream life, yeah right. Dream on…

Archive for the ‘Recycle’ Category

Operation Fence (Part 2)

My new ‘Roman’ fence (it wasn’t built in a day) stayed propped up with various bits of stakes etc, and was often laying on the garden for weeks as the weather and work conspired against me. As a friend noted, it wasn’t going to keep anything out.

I finally got all the posts in. A couple of pieces had to have some length taken off the legs to bring them down near the rest of the fence. Some posts went through the legs of the bedhead, some tied to the sides.  Mostly wooden stakes as the plastic ones I bought were too thick to go through the bedposts. Then the adding of the netting.

Got nice black plastic net for around $20 for 10m at Bunnings which was better than chicken wire as it won’t stay pushed up if they try to go under (a few sections I’ve added a length of wire at the base to keep it down), but being black it fades from view. I’d have had to paint chicken wire. The netting will need a few more cable ties added once it has relaxed into place a bit more but it became a race against the sunset to get it on.


There are three gates which simply lift and rotate around the stake through their post.  This means I can push the mower through the back, or open the front to add pine bark etc.


So far so good. The petunias are flowering (apparently petunia buds are yummy…) and the chrysanthemum is covered in buds.

Next job, to extend the garden to the fence, and add a couple of clematis.


See part 1 here


Operation Fence (part 1)

I’ve been gardening here at 28 Gumtrees since I was 10.  Over the years I’ve  grown and shown daffodils and chrysanthemums,  grown just about everything, built gardens, destroyed gardens, planted, removed, and planted more trees. However when I bought the place 6 years ago my focus turned to the inside, and the garden was left to fend for itself.  Around the same time, the wallabies started to come in, although it wasn’t until the drought hit 4 years ago that I really noticed them eating anything but the lawn.  Very few plants are safe from a hungry wallaby, and once they discover a plant they will return to it over and over.  I have, or rather had, a lovely little self-sown hebe that was about half a metre high that suddenly was not allowed to have a leaf. However, the parent plant, just 2 metres away was barely nibbled. While I stripped floors and rebuilt kitchens and painted everything in sight the garden struggled. Between the weather and the hopping lawnmowers I only had to mow about 8 times a year, mostly to get the weeds around the lemon tree (compared to the 50 times a year average before the wallabies).  The twitch (which they don’t eat) took over the garden beds, and things either survived or died, pretty much unnoticed.

Abandoned

Before Christmas last year I decided this had to be the Summer of the garden, and the weather (and the loan of a trailer!) co-operated nicely.  Project Resurrect began with 7 loads of green waste, and a number of loads of pine bark. My plan was to plant what I had, and only grow things that could survive the wallabies since without installing a few hundred metres of fence, I had little way to keep them out.  I started poisoning the grass, then gave up and just dug holes in the weeds in an effort to “Plant Everything” before it got too hot.  I got about  3/4 of the pots in, and dumped pine bark on the weeds to make new garden beds.

I removed 6 trees (5 of them dead, 1 almost so),  got some bargain plants through exchanges and markets and was determined that I was not going to start “collecting’ plants like I had in the past.  I once had about 30 different dianthus (wallabies’ favourite food it seems) and I haven’t seen an ixia or muscari flower in 5 years.  While I was willing to put a few fences around some trees until they got big enough to be out of wallaby reach, I was determined not to end up growing a bunch of wire cages. If it wouldn’t survive without minimal attention from me it wasn’t going in. However, when I planted out the two chrysanthemums that have been struggling along in tiny pots for a couple of years right beside the path that Rufus uses to come and go at night, I was not prepared to go to water them the next day to find they did not have a leaf left between them!  This combined with the demise of the long awaited liriope flowers before they even broke bud made me snap. I started planning how to fence off a part of the garden without spending money.

I thought of using scrap timber I had on hand to build rectangular frames for chicken wire, then attaching them to posts I’d have to buy, but I wasn’t loving the idea of all those straight lines around my flowers.  I thought of chicken wire or plastic mesh around star pickets (until I priced them at nearly $15 each!), but wallabies have a habit of just leaning on wire until it sags, so I’d need a lot of posts, and it would look a bit like a poorly made chicken run. I almost got some (give away) lengths of iron balustraude, but they would have had to be carted up a hill, AND cut before I could fit them on the trailer to bring home –  which was a bit beyond my skills and strength.

Then, someone posted a headboard bench seat –  you know the type –  wooden bedhead, with the footboard cut in half and attached as arms each side and a few planks to make a seat.  

And I remembered an idea I had to make a gazebo for the back garden, but rather than build a railing, I wanted to use the timber and metal bedheads that I often saw at the Tip shop and garage sales. I wanted bedheads like mine, timber posts and black ironwork.

So  I set off for the Hobart Tip shop-  bedheads please…  They had one.  One. A narrow piece of metal, missing the side posts… Not worth bringing the trailer over for.  So instead I went home and hitched the trailer to get some bark – and thought I might as well look in Mornington Tip shop,  maybe get one there to start the collection.  $50 later –  and the trailer was fully loaded with 11 bedheads plus another bit.  Dropped them at home,  carted them down the back, hitched the trailer up again, went and got some pine bark,  brought that home,  disconnected the trailer and went back to Bunnings to get stakes and cable ties and wire and most importantly…  spray paint!

Operation Fence had begun.

Step one: Get some consistency. With only 2 bedheads that actually matched in design, and one that was bright blue, another gray, and the rest strange combinations of  sun faded and scraped black the first step was to spray them with flat black paint

Then, test out the placement. I discovered I had an extra piece which when inserted meant I could extend beyond the current garden. If I’m going to all this effort I want every centimetre I can get.

Test run

See part 2 here

Upgrading the salon desk

A couple of years ago I bought a new in desk extractor fan for dust and fumes for the nail salon.  It cost a small fortune, and for another small fortune I could have got it already seated in a cheap and nasty laminate desk that didn’t really fit the space I had at the time. (Most of them had one small drawer for storage, if that.)

I started out thinking I’d have to make a desk, then ran across an oval computer desk in a discount clearance centre. I’d seen this desk at $90, looked at it at $69 and decided it was too flimsy (the oval sat atop the  two side pieces (a file drawer and a computer tower box) on 2 tubes that allowed the drawers to roll under the desk.)

When it hit $25 I looked at it again with new eyes. For $25 I got 2 pairs of drawer slides, 8 castors, and a nice large top – all in horrid brown plastic laminate (crapboard as my neighbour calls it). The top was big enough to fit the fan in, which was the most important consideration.  So I bought 2 of them.

I shaped one top, attached it to the bases with 2 posts each side (so much more stable), mounted the fan, set up one set of drawers, cut the other set down and made them sliding shelves,  added some  wings to hold UV lamps and even cut the spare top in half and made shelves.

I ended up with raw chipboard against me as I worked and so it got covered with a layer of duct tape. One day soon I would  give it a coat of paint I said.

2012JAN07salon 007a

Three years later, the salon has moved rooms, the duct tape was half off for the third time and the acetone had wiped away some of the plastic wood finish. It looked charming – not.

2014NOV02 006a

So, since I had the paints out for the kitchen, and I had a sudden surge of clients that left me with a week without any appointments, I taped off the metal, undid the wings, rolled on some primer and a coat of Lexicon white acrylic.

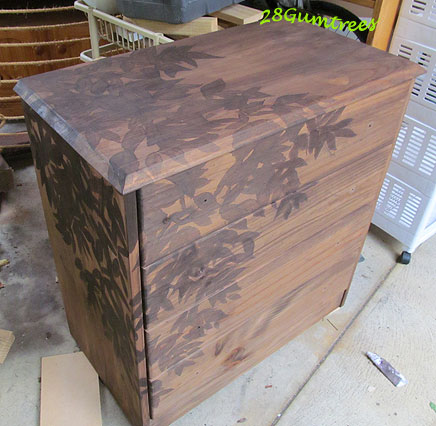
Then I started playing. I diluted some black acrylic, brushed it on, sponged it back, rolled over it with diluted white, brushed some more, rolled some more.

And TaDa!

2014NOV05 012a

I went into Bunnings to see if there was a non yellowing oil based polyurethane to seal it with (can’t use acrylics with acetone around). I didn’t think there was, thought I would probably be rolling on a coat or two of normal poly and watching it yellow up over the next year or two. But the woman serving me said there was a clear paint, not a poly, from Dulux. It was low chemical and so didn’t yellow she said. The label said it discouraged chroming with low chemicals. It wasn’t until afterwards that I discovered chroming is the word for using spray paint fumes to get high!

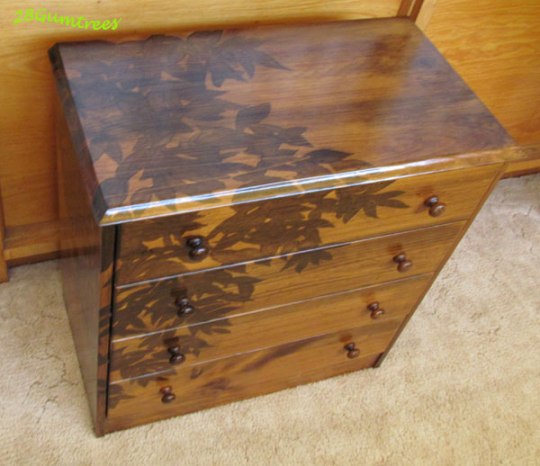
So I sprayed my desktop.

This was it two days later after 3 light coats.

2014NOV10 001a

No that is not the lighting, it is yellow! Not cream, or slightly off white. Yellow!

Lesson learned – This 2014NOV10 006ais NOT CLEAR.

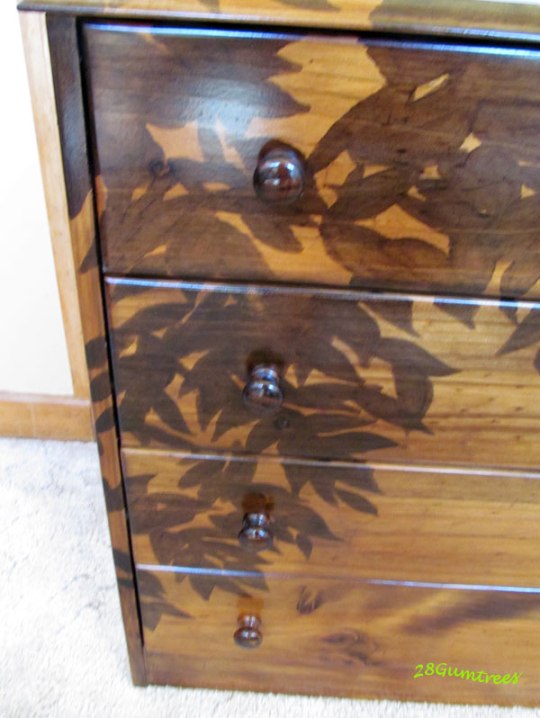
My desk looked like something pulled out of grandma’s kitchen which hadn’t been changed since 1930.

I couldn’t face the thought of all those layers and dying times again. But I couldn’t live with pee yellow either, even the fake woodgrain had been better.

So I got the primer out again, and  coated the desk. Then a coat of white semi gloss enamel (left over from door frames). Then the next day, another coat of white, this time with some diluted black enamel (left over from my bedroom trim) painted into the white while it was still wet, with a feather. No sponging, no blotting. A couple of spots got a bit of another layer over them to fix up strange bits the next day. No sealer (so it’s not as shiny as it was). And there are brush marks because I didn’t use the roller this time.

But it looks so fresh and bright. And best of all, it doesn’t show the acrylic dust, which was the whole reason for painting it 😉

2014NOV21 048after

2014NOV21 060a2014NOV21 067a

There are black buttons that cover the screw holes, it just isn’t dry enough yet 🙂

before-after-desk

26 Million dollar table

This Summer there were a few days that hit ‘roast’ on the thermometer. On one of them I hosted a few friends  for a BBQ on the terrace.  I don’t think any of them realised what a miracle it was that we were seated at a table.


See this was my table.

2007DEC29_004

And this was my table the day before…

2014JAN12 003a

And this was my table leg…

2014JAN12 005aNot only had the bottom broken off, but further inspection found it soft and spongy all the way up.

When the leg first started breaking off I thought I could maybe cut all the legs shorter and put on castors. But when I realised the extent of the damage I was devastated. This was MY table. I bought it from a clearance table when out shopping for a 1/5th of the original price and somehow managed to fit it in the car. I then had a prolonged ‘discussion’ with a man in K&D who insisted I didn’t want to varnish it as I would have to sand and recoat it every year. He insisted I should ‘oil’ it. I didn’t want to oil it, I wanted a table I could wipe clean before eating off it.

I pointed out that the tin of oil he had handed me instructed one to “sand back and recoat every 12 months” and that having grown up with wooden boats I certainly hadn’t had to revarnish them every Summer. I finally walked out with my can of marine varnish. I loved how that table came up.

2009FEB22 013

That was 8 years ago.  It was re-coated in the third year.  It should have been redone a couple of years ago but somehow it never made it to the top of the job list. (Funny that, since I was stripping and varnishing floors and painting walls etc that year.) There were a couple of cracks in the top that were starting to lift with the rain. Two years on these were serious rifts in the wood. But it was usable. At least it was until half the leg fell off.

‘Gentlemen, we can rebuild him. We have the technology. We have the capability… ‘

Well I thought I did, until I tried to replicate the angles cut at the top and bottom of each leg. I turned it, turned it again, picked it up, looked at it closely, stepped back, held straight edges across the angles,  but I could not find a way to cut the new leg to replicate the old. I ended up coming inside and phoning my reno guru who talked me through how to cut them – which still didn’t make much sense. I walked outside, picked up the new leg, turned it  around and wham, there was the angle, so easy to replicate. Don’t know why I couldn’t see it before, I tried holding it every way possible.

Once it was cut I needed to replace the bolts. This was the tricky bit. I thought I would have to figure some new way to bolt all the way through, but amazingly Bunnings had exactly what I needed – furniture bolts (and an employee who could tell me how to install them – put a nut or two on the top section, then use them with a spanner to screw the bottom section into the leg.)

2014JAN12 007a 2014JAN12 008aI eyeballed the angle for drilling the holes for the bolts and no one was more surprised than I was when I got it right the first time – the bolts slid into the table bracket like they had been made for it.  I’ve also put plastic ‘feet’ on the end of each leg so they are no longer sitting directly on the cement.

TaDah! Dinner is served.2014JAN12 017

Later I pulled the table back into the carport and dug the bad wood out of the cracks, scraped and sanded  the varnish back to raw wood. The biggest of the cracks had almost rotted out the entire piece –  the ends of the slats were barely resting on wood at all. I knew my skills didn’t extend to replacing the edge of a circular table, so I stuffed the hole with wood glue and sawdust, clamped it, let it dry, stuffed in some more, let that dry and then filled the top with wood filler.

2014MAR28 006

I thought I would probably have to paint the edge of the table black to hide all the filler, but  after the first coat of varnish it was not that noticeable.

2014APR26 012

Eight coats of varnish later and the table is back to it’s former glory… although it’s a different colour. Much more like teak and a range of tones  instead of the solid gold that it used to be.

I like it.

2014APR26 011

(Yes, every time I tried to take a photo it had been raining.)


Let there be Light(shades)


A friend gave me a couple of lovely tall lamps with wooden bases and shades that pivot so you can tilt them for reading. Unfortunately one of the shades was very watermarked.

2013DEC14 005

Watercolours wouldn’t cover it, and were too hard to mix to match the colours I had chosen for downstairs, so I ended up painting the shades with the sample pots of wall paint. The light doesn’t come through them now, but with the bases resprayed white they look good, if I do say so myself (see the full lamps in the downstairs reveal coming soon)

The  first design I tried didn’t work so I scrapped it and went back to the beginning.

The shading I simply brushed on without cleaning the brush so it blended from one colour to the next.

Then I used silver paint to freehand a design onto each shade.

2013DEC19 002a

I can’t believe downstairs is nearly done and I haven’t started blogging it. It’s been a hectic 3 months. Hopefully the next few months will be just as hectic with  b&b guests….

Insects in the living room

Sometimes I wish I wasn’t alone just so something would move or happen when it wasn’t me doing it. An elf would be handy.

A month before I started on the room of hell downstairs, I decided something had to be done about the buffet. This cabinet/buffet/console,  whatever you like to call it, was the garage sale find of my life. Having missed out on one for $120 that needed a LOT of work,  when I asked the price of this one at a sale I only called into on the spur of the moment, I wasn’t expecting a price tag of $60. And they had a ute and delivered (it was only a suburb away). It then sat in the carport for months  because I really wanted to stain it darker to get rid of the 80’s pine look. (And I will one day, especially when I pull up the carpet and reveal the light Tas Oak floors under it. Meanwhile last Christmas I decided it was good enough to use while it waited for it’s makeover so it came inside.

2012DEC12 Loatta 046

The problem was it sat empty all year because everything I wanted to store inside looked messy behind clear glass. (I really wanted to store the tablecloths and mats and assorted decor. So in September I lifted the glass out of the doors and searched   for my glass paints (a story in itself –  note to self: Don’t move things without leaving a note of where I’ve stored them)

2013OCT14 002

I drew up a couple of designs and started outlining them with the leading paint.This was hard on the hands, and I ended up peeling one entire lot off and starting again for various reasons. Between total exhaustion from painting and filling downstairs and lack of good lighting it wasn’t until a week ago that I actually started laying in the colours.

I had a party here on Wednesday night, and true to form, I finished the glass painting about 2am on Wed morning….

Now the photos are not the greatest – I taped a torch in the cupboard for some light. Eventually I’ll get some LED strips and insert them around the door for a better backlight. Unfortunately where the cupboard sits, without backlighting they are barely visible designs.

2013DEC12 002

Ready for the big reveal? Here they are in their (poorly) lit glory.

2013DEC12-016

Panel 1

panel1k

Panel 2

2013DEC12-059

Now to start filling the cupboard!

Chestoration

Is it restoration when the original wasn’t in bad condition, especially cosmetically?

I actually finished my shadow chest of drawers just at the end of the Summer holidays, after being delayed by the swirling drifts of wisteria flowers and elm seeds in Spring and then hottest Summer in decades. Now the cold of Winter has set in maybe I’ll actually get it posted.

I came across this chest of drawers at a garage sale in October.

original golden pine.

They needed a new runner ($0.90 at Bunnings), and the base in one drawer was broken but otherwise was in very good condition. But I didn’t want orange pine in my bedroom (or anywhere else in the house for that matter.}

So I sanded the varnish right back, bought some stain, and started to play.

First was the staining. Wenge is a dark greyish colour, like walnut without the red undertone. I loved it. Two very light (diluted) coats.chest-inspire

This position in the drive inspired me and so I started to play some more. I also had this wonderful burn pile buffet stained image from Sawdust & Embryos, in the back of mind.

chest-leaf

Armed with some wisteria leaves, some charcoal, a small paintbrush and some walnut and wenge stain mixed together,I began.

chest-detail1

A close up as it was drying. I actually learned to put less on the brush and so have less bleeding. I also dry brushed a lot of the edges again.

chest-front-paint

chest-before-varnishI’ve put this photo in because it’s a very  close match to the actual colour. Once it came inside and was varnished it seems to  glow reddish in the photos, but it is really like a glossy version of the above.

chest-done2Ta Dah!

chest-top-view

chest-detail

chest-bedroom

I’m pretty pleased with it as a first attempt. Now to do the 1970s  bedside drawers to match 🙂

I was inspired by the burn pile buffet at Sawdust and Embryos

Sharing with the amazing DIYers at the link party with Traci at Beneath My Heart


chest-before-and-after

Polish is the key

I have a matter of days to get this house ready for students to move in. I’m looking for people to sand floors, tossing up whether to rip up more carpet, pulling out cupboards (more on that later) and I have a garden where the weeds are growing so fast they wrap around your ankles if you stop to admire the flowers. I plan to build floor to ceiling shelves down the front hall to turn it into a library. I have 3 rooms of books and junk to pack into boxes and relocate. So what did I do yesterday? I went to the tip shop of course. Yes I told myself I was looking for single beds that I need, but that doesn’t explain why I was inside looking at the dishes.

In my nonexistent library I plan to build one shelf that will be the ‘entrance console’ – maybe have a mirror behind it, space for a vase or something. After all you’ll open the front door straight into two walls of books, no foyer, nothing to say come in. And on that shelf I thought it would be nice to have a dish to toss my keys, headphones etc in when I walk in the door. So I’m looking through the dishes at the tip shop. There’s a brass one, labelled with whiteboard marker, $2.30 and a C in a circle. I’m not sure if this was supposed to indicate it was copyrighted or made of copper. It was very dirty brass and had some large black marks through the bowl and on the back. Probably wouldn’t clean up – after all someone tossed it out. But it was nice and heavy, maybe I could spray paint it with a bronze and it would do? Then beside it was a silvery chromey (I’m good with metal identification right?) looking bowl with a gorgeous punched pattern around the rim. You know the blackish look silver gets when you don’t clean it for years? (Go on, admit it, we all have that ‘its too hard’ piece in the back of a cupboard somewhere.) Well this bowl didn’t have that look, but it didn’t have a stainless steel clean look either. And it had big black stains in the bottom, like the coating had worn off. (Gee, if only I’d thought to photograph them I wouldn’t need to use all these words.) Anyway, it was only $2 and would look awesome painted black. I’m sure I could find a use for it – after all I really need bowls at both doors right?

By the time I got home it was raining (well PELTING) down, so I pulled out the Silvo and had a go at the bowl. Wow. Couple of little pitted marks in the bottom, but really pretty good for an ornament. No idea what I’m going to put in it, but I am sure of one thing. This bowl had never ever seen silver polish before.

So, I grabbed the Brasso. The brass bowl took a little longer and some lemon and bicarb, and the use of a some 1200 grit wet and dry sandpaper on some of the stains. But an hour later this is what they looked like.

A little more sanding and a good polish with Brasso this morning and look at it now!\

I bought some more sandpaper today – I can probably get the residue of the stains out with a little more work (I am SUPPOSED to be doing a million other things before I get to put bowls in the hallway…)

I am now convinced these bowls were the victims of a throwaway society. Maybe their owners have never seen anything polished? I can see it now, the new bride tossing out the canteen of silver cutlery because it ‘went off.’ Maybe I just have too many memories of newspaper covered counters spread with all the silver, then the copper, then the brass for polishing before every party. Polish still works folks (despite the craze recently for distressed and worn looking items.) Polish is the key.

The Tortoise Whisperer

Tales of the Lost and the Loved

Carol Naylor

Contemporary textiles, making, exploring and communicating ideas

Leaf And Twig

Where observation and imagination meet nature in poetry.

Found This Painted That

Decorating Solutions for the Dollar Challenged

28gumtrees

Dream house, dream life, yeah right. Dream on...

littlecrazyhome

Just another WordPress.com site

Unlikely Explanations

This site contains humor, satire, comedy, and/or whimsy. Please don't take anything you read here seriously.

Crone and Bear It

The red-headed stepchild rocks mid-life

Worst 2 Best

Renovation and extention of a 1921 Californian Bungalow